1. 유니티 설치
를 통하여 UnityHUB 설치 후 2022.2 이상 버전의 Unity3D를 설치 한다.
2. Visual Studio Code 설치
2-1. IDE 설치
https://code.visualstudio.com/download
를 통하여 최신 버전의 VS Code를 설치 한다.
2-2. VSCode Extension 설치
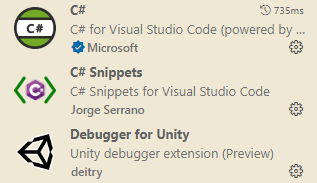
VSCode에서 다음 확장 프로그램들을 설치 해 준다.
C#을 제외하곤 개발 편의를 위한 옵션이므로 취향에 맞춰 설치 하도록 한다.


2-3. C#에 Auto Formetting 적용
VSCode> File> Preferences > Settings에서 다음과 같이 옵션을 변경 한다.

Prettier와 같은 Formetter 확장 프로그램은 C#을 지원하지 않기 때문에 settings.json을 열어 다음 구문을 삽입한다.
{
	...

	"editor.formatOnSave": true,
	"[csharp]": {
		"editor.defaultFormatter": "ms-dotnettools.csharp"
	},

    ...
}
* 참고: settings.json 편집은 setting에서 mono를 검색어로 입력하면 여러 옵션이 보이는데 다음과 같은 설정에서 edit in settings.json를 눌러 편집한다.

* 참고: 프로젝트 디렉토리에 omnisharp.json 다음과 같은 파일을 만들어 formatting 옵션을 변경 할 수 있다. (불필요한 것들은 지우고 변경 할 옵션만 남겨서 적용하도록 한다.)
{
    "FormattingOptions": {
            "NewLine": "\n",
            "UseTabs": false,
            "TabSize": 4,
            "IndentationSize": 4,
            "SpacingAfterMethodDeclarationName": false,
            "SpaceWithinMethodDeclarationParenthesis": false,
            "SpaceBetweenEmptyMethodDeclarationParentheses": false,
            "SpaceAfterMethodCallName": false,
            "SpaceWithinMethodCallParentheses": false,
            "SpaceBetweenEmptyMethodCallParentheses": false,
            "SpaceAfterControlFlowStatementKeyword": true,
            "SpaceWithinExpressionParentheses": false,
            "SpaceWithinCastParentheses": false,
            "SpaceWithinOtherParentheses": false,
            "SpaceAfterCast": false,
            "SpacesIgnoreAroundVariableDeclaration": false,
            "SpaceBeforeOpenSquareBracket": false,
            "SpaceBetweenEmptySquareBrackets": false,
            "SpaceWithinSquareBrackets": false,
            "SpaceAfterColonInBaseTypeDeclaration": true,
            "SpaceAfterComma": true,
            "SpaceAfterDot": false,
            "SpaceAfterSemicolonsInForStatement": true,
            "SpaceBeforeColonInBaseTypeDeclaration": true,
            "SpaceBeforeComma": false,
            "SpaceBeforeDot": false,
            "SpaceBeforeSemicolonsInForStatement": false,
            "SpacingAroundBinaryOperator": "single",
            "IndentBraces": false,
            "IndentBlock": true,
            "IndentSwitchSection": true,
            "IndentSwitchCaseSection": true,
            "LabelPositioning": "oneLess",
            "WrappingPreserveSingleLine": true,
            "WrappingKeepStatementsOnSingleLine": true,
            "NewLinesForBracesInTypes": true,
            "NewLinesForBracesInMethods": true,
            "NewLinesForBracesInProperties": true,
            "NewLinesForBracesInAccessors": true,
            "NewLinesForBracesInAnonymousMethods": true,
            "NewLinesForBracesInControlBlocks": true,
            "NewLinesForBracesInAnonymousTypes": true,
            "NewLinesForBracesInObjectCollectionArrayInitializers": true
            "NewLinesForBracesInLambdaExpressionBody": true,
            "NewLineForElse": true,
            "NewLineForCatch": true,
            "NewLineForFinally": true,
            "NewLineForMembersInObjectInit": true,
            "NewLineForMembersInAnonymousTypes": true,
            "NewLineForClausesInQuery": true
    }
}
3. .NET 설치
https://dotnet.microsoft.com/en-us/download
를 통하여 .NET 7.0 SDK 이상의 core SDK를 설치 한다.
https://dotnet.microsoft.com/en-us/download/dotnet-framework
를 통해 .NET Framework 4.7.1 버전을 설치 한다. (다른 버전은 테스트 해 보지 않았다.)
4. VS Build Tool 설치
https://visualstudio.microsoft.com/downloads/?q=build+tools
를 통하여 vs_BuildTools을 설치 한다.

5. 유니티 설정
5-1. 에디터 VSCode로 지정
Unity > Edit > Preferences > External Tools > External Script Editor > Visual Studio Code로 변경

5-2. .NET 4.X적용
유니티 프로젝트를 생성하면 기본으로 .NET 2.1을 사용하도록 되어있다.
보다 진보된 C#을 위해 버전을 변경한다.
Unity > Edit > Project Settings > Player > Configuration > Api compatiblity Level > .NET Framework 으로 변경

'Developments > Unity3D' 카테고리의 다른 글
| Resolution Failed. 오류 해결 (0) | 2023.05.29 |
|---|---|
| Gradle failed 오류 대응 (0) | 2023.05.29 |
| Android 디바이스에서 Streaming Assets 읽기 (0) | 2020.07.30 |
| VSCode 에서 import from UnityEngine.UI 오류 발생시 (2) | 2020.03.05 |
| VSCode에서 OmniSharp 오류 발생시 (0) | 2020.02.24 |